Showing posts with label purple. Show all posts

Tuesday, May 1, 2012

Purple Sparkles Monotone Manicure

Hi all! It's that time of the week again - and I'm here with a new look for ya! 
I recently picked up two new polishes from RiteAid this weekend and here are my results.


They are actually pretty much the same hue, but one is a straight up shimmer while the other polish is infused with violet glitter. At first, I was torn as which to get, since essentially they were the same color, but for some reason I just couldn't resist having them both. ^^; Besides at about a dollar a pop it wasn't too hard to say yes.


Since, they were so close in color I decided I wanted to do a monotone look. Originally I was just going to do something simple like an accent nail. But when I tried that out, I just felt it was too booring! 


So I thought why not get a little more adventurous! And thus I ended up with this look. Dotting, Taping, Striping and Chevrons everywhere! :P


My Lacquer List:
Wet n Wild Megalast - Disturbia 217B (Pretty Shimmer)
Wet n Wild Wild Shine - Night Prowl (Violet Glitter)

As you can see its pretty much the same color, but with different accents. And really, unless you're in the sunlight you won't be able to see all these subtle designs on my nails ^^;


I think I took the most photos for this look so far, because it was so hard getting the light to hit at the right angle! ^^; But there you have it. A sleek monotone look, without too much flair unless you pay attention to  the details.


Also I'm really digging the new wet n wild packaging. I know I mentioned in the previous Pastel Polka Dots French Nail Post, that they had new bottles. But their wide tipped brush makes applying this stuff a snap! And I'm all for easy :P

Well hope you all enjoyed. :D And please stay tuned for more manicures <3
Thank you!

-wanyachu 

Thursday, April 12, 2012

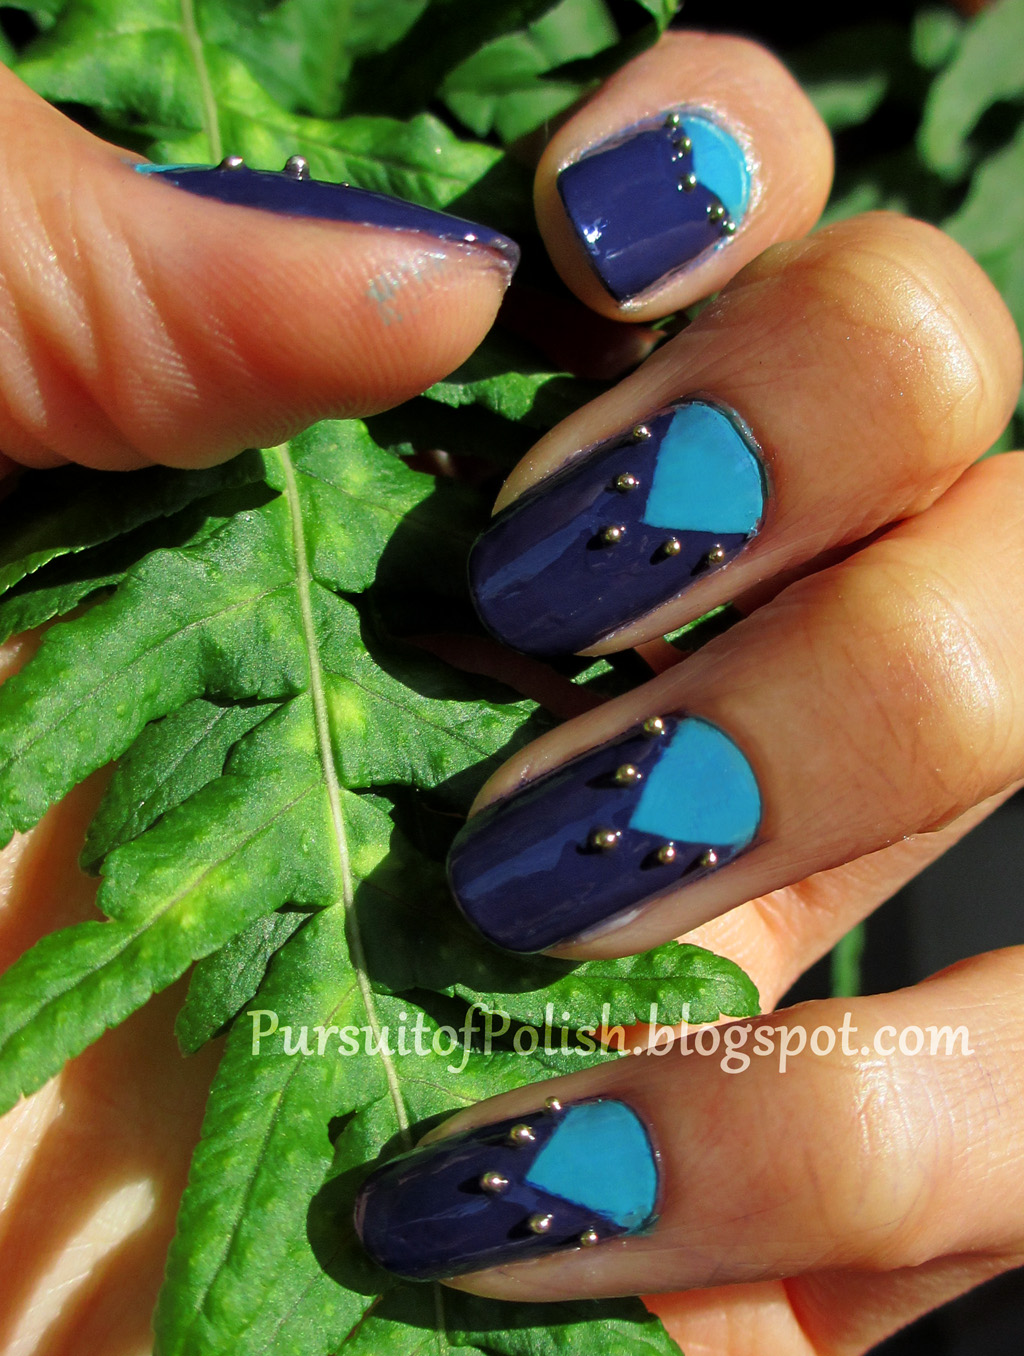
Studded Chevron Half Moon Mani

Hi all! Banged out my second look for you this week.


 What started as horrible art block ended up being quiet  stylish in my opinion. I always love when this happens! Makes the struggle all the more worth it! :D


I have been doing some pretty cutesy, fruffy feeling stuff lately so I wanted to do something more Modern. So here is my take on a more edgy, half moon mani. I pulled this off with some simple scotch tape and a tube of bullion beads I had laying around.


I spent so long trying to come up with an elaborate design, but sometimes simple really is best. Although, I couldn't control my ostentatious ways complete. I just had to throw in those gold beads as little stud accents! 


I used some new lacquers I picked up from Ulta for this look. The deep purple is Essies' - No More Film. And the teal cream is M.A.C's - Ocean Dip. 


No More Film is a gorgeous purple color, even though it's erring a bit darker in the photos. In real life its a great violet color, specially in the sun!

Ocean Dip is also a nice teal; a great fit for summer! The color is not as saturated as most teals I've been seeing lately, but the muted nature of this polish really makes the Purple in No More Film come out. 


I took a thicker top coat this time and then went in with a toothpick to apply the beads as studs. Once they were firmly place and pressed in, I went back with another topper just to be safe. 


On my Third day of wear I still have most of my studs! Which was pretty impressive, since I was sure I would've lost more by now. But once a few more fall off I think I might just cheat and dot some gold polish back in with a toothpick. Its like the poor man effect! 

Hope ya'll enjoyed! 

-wanyachu


Monday, February 27, 2012

Mod Plum & Green Two Tone Manicure Tutorial

Hi lovelies, I'm back again for another Manicure Monday look!
This time I tried to do something a little different and put together a picture tutorial for you all. 
(If impatient click here for Picture Tutorial)


But first here is the completed look I'll be sporting this week on my nails. I wanted to do something colorful and fun for the lovely weather we have been having in the Golden state.  


The color palette for this look actually comes from some bowls we are selling at work :P I thought it was such a fresh combo of lime and plum that I couldn't resist trying it out on my tips. So see! Work is not a complete drain of creative energy, sometimes it can be an inspiration as well!

Luckily enough I went home and dug through my polish box and came up with these two beauties.


The Nail Polishes:

I received the FACE polish as a gift, but never got a chance to try it out. The color is a sensuous medium tone violet called, Plum Forgotten. I had never heard of their polishes before and was pleasantly surprised with how smooth and saturated this lacquer is. Interestingly enough it also dries slightly matte, but you can't tell here because I top coated over the final look.

The lime green on the left is China Glaze in Entourage. This is a very saturated yellow-green, bordering on chartreuse with fun micro glitter. I've actually had this polish for quite a while, but it is just so overpoweringly electric when worn by itself I never gave it much thought. So when I stumbled upon it again I realized what great potential it had as an accent color! And thus this look was born! :3


So without further ado here is my little step by step. 
Lemme know if you guys have any questions!


Tutorial

Step 0: Paint your nails and let completely dry! Sorry forgot to take a picture of that but ya'll know the drill. I did alternating colors of Plum Forgotten and Entourage.

Step 1: To make a clean curve between the two colors I hole punched circles out of envelope labels. I wanted to use those paper hole protector thingys...what are they called even!? The reinforcement stickers that kind of look like donuts....

Anyways, the point is that I didn't have any, probably because I don't even know what they are called =_= So I improvised!

You can really use anything that will stick to your nail and has a curve to it. I even had a friend once who cut masking tape to match the arc she wanted...but that's super dedication I don't have v_v;

Step 2: Stick your guide (tape, label, hole protector...) onto your nail! Be sure to center the curve or else you will get crooked a crooked arc. Make sure the edge where you will be paint over is securely pressed down so you don't get any leaks.

Then go to town and Paint 'em up!

Step 3: Quickly but carefully remove your guide. I suggest taking it off right after you lay down your lacquer. You don't want to leave your guide on for too long, or else any leaks that did manage to seep under will get a chance to dry.

***more taping off tips at my Pink Petite Four Tape Tutorial***

Step 4: Get out a dotting tool (toothpick, bobby pin, whatever floats your boat) and go dot away! Here I used OPI for Sephora – You don't know Jacques and A-Ha! Moment.

Ta dah! Now you're done and ready to rock this playful retro, manicure!
Sorry ended up being more wordy that I had anticipated. So to make it up for your candy starved eyes some more pretty pictures:P


Are you guys sick of seeing my garden foliage yet?
I will try to come up with more interesting props next time!


Thank you for reading! And please leave me any questions, comments, criticism, love...it will all be much appreciated!!!

-wanyachu  

Wednesday, January 18, 2012

Bling & Art Deco Lilac Black Manicure

Hi again! I'm back and with a special manicure for you all this week!
I'm calling this one Blinging Deco Black Yeah! as a play on Bring Deco Back in celebration of my new Blog look. :D *play overrated popsong in BG*
I liked the strong lilac & black contrast and thought it was very reminiscent of the art deco period. Also, since I lucked out and had time off the job I decided to add some crystals, knowing there was a reduced risk of them falling out :3
Sweet and simple, with a touch of glamor.
I did two coats of Sally Hansen Hard as Nails in No Hard Feelings as my base. Then tipped out with classic frenchies in Sally Hansen Insta-Dri – Night flight. Next I adhered some small white crystals with my clear coat, and finished up with another layer of top coat~
I actually adore adding crystals & small plastic pearls to my nails, but usually they just get in way too much >_< So this was a nice little treat for myself!
Hope you all enjoyed this look and my new background too! :D
- wanyachu

Monday, November 21, 2011

Magnetic Nail Polish – Nail Inc. Houses of Parliament

Magnetic Nail polish GET!!!

I was so excited when I first heard about these new magnetic nail polishes and now one is finally mine! *mwahahahhaaa*

See how victorious that picture looks? My prize held high and juxtaposed against the dramatic sky ~


This is what the final product looks like. Pretty awesome right? ^_^ It has this smooth airbrushed look to it and seems way more professional than it really is :P

This nifty, new lacquer invention contains little magnetic particles mixed into the polish. When you hold the cap (which has a built in magnet) over your wet nail polish the particles are drawn together and form whatever pattern is printed into the cap.

Kinda confused? Its okay! Because I took lots of pictures! :D
The top has a special magnet embedded into it along with a little plastic ridge which makes it easier to align your nail with the magnet.

On the side of the cap is a picture of the design this specific magnet will produce. I also tried holding the magnet next to the nail polish bottle and it is strong enough to produce the pattern through the glass! :O So there is a close up of the design included too!

As for color, the stuff in the bottle is a medium range of what you will get after the magnet magic. As you can see here, there are some little flecks of pink and silver mixed in which becomes super defined after the nail polish settles into the design.

Since purple is my favorite color Houses of Parliament was the obvious color pick for me. But the Silvery-chrome of Traflagar Square and luscious lagoon of Whitehall Teal where both pretty hard to pass up. However, at $16 a pop from Sephora I had to resist :<

I know LCN also has their own line of magnetic lacquers which includes: 8 Colors and 2 different pattern designs ( I want the starburst one so bad!!! ). These run about $10 per bottle and $20 per magnet on their site so I think overall its a comparable price.

Have any of you tried these fun polishes out yet? I'd love to know how the LCN ones look and even the other Nail Inc colors. ^_^

PS. Heres a little bonus of my pup trying to help out with the photoshoot :P