Tuesday, November 29, 2011

Snow Flurries with China Glaze Cracked Nail Polish

Hi again! :D So lets face it, living in sunny southern California means we don't really get the good old white Christmas weather. Which is really nice 9 times out of 10 but, sometimes I just want to experience the magic of the first snow fall too! And since I'm way too busy to indulge myself and drive up to the mountains here is a quick fix for my cold weather craving.

Snowy Manicure!

This can double as a Chanukah manicure as well, since the color combo inadvertently turned out to match. :D Woohoo ~ bonus points. Its a two-in-one deal.

I used two new lacquers by China Glaze for this mani. The base is China Glaze – Blue Year's Eve and the cracked polish is their Oxidized Aqua. I picked up these polishes from Ulta, since they were having a buy 2 get one free deal and was dying to try them out.

Blue Year's Eve is such a lovely, sparkly colbalt blue color. Its not too dark and reminds me a lot of my Sally Hansen X-Treme Wear in Blue it.

Oxidized Aqua, which looks more silvery than blue when juxtaposed with this sapphire color, is also super gorgeous!!! I'm so picky about these crackled polishes it is kinda ridiculous. I love they way they look but, only a few actually crackle to my liking and this is definitely one of them. <3 Super easy to put on with a great crackle effect :D

Finally, since I'm such a spazz I had to try stamping some snowflakes on to get the full effect. They're a little hard to see but are sneakily there on my thumb and ring fingertips. :P I used Sally Hansen Insta-Dri in Whirlwind white, the best white to stamp with IMO, with Konad plate m59.

So whether the weather be snowy, sunny or whirlwinds hope this brought you a little more season spirits!

Thursday, November 24, 2011

Posh Gold Konad Plaid Manicure

First off, Happy Turkeyday to everyone!!! I hope you all have a wonderful day filled with family, fun and most importantly food ~ That's really my favorite reason for this time of year *g* the FEAST!

But lets get down to the meat and potatoes of this all and move on to the mani!

So to go with all the comfort food and festivities I wanted to do a manicure to match the mood of the holidays.

*Ta-dah* This is what I came up with ^_^ It's a little bit of glam while still being cozy, they're like posh flannel pjs made of gold :P

I painted Sally Hansen Guilty Pleasure as the base coat and then stamped with my tried and true black, Sally Hansen Insta-Dri in Night Flight. I used Konad M60 for the plaid pattern and then the french plate, M19 for the tips.

I saw a gold and black mani a few months back and remembered loving the color combo. I thought it looked so classy and am glad I finally got a chance to try it out!!!

Reminds me a little of Burberry no?

Well hope you all have a lovely Thanksgiving weekend!!! Food coma today, shop-a-holic tomorrow!

Monday, November 21, 2011

Magnetic Nail Polish – Nail Inc. Houses of Parliament

Magnetic Nail polish GET!!!

I was so excited when I first heard about these new magnetic nail polishes and now one is finally mine! *mwahahahhaaa*

See how victorious that picture looks? My prize held high and juxtaposed against the dramatic sky ~


This is what the final product looks like. Pretty awesome right? ^_^ It has this smooth airbrushed look to it and seems way more professional than it really is :P

This nifty, new lacquer invention contains little magnetic particles mixed into the polish. When you hold the cap (which has a built in magnet) over your wet nail polish the particles are drawn together and form whatever pattern is printed into the cap.

Kinda confused? Its okay! Because I took lots of pictures! :D
The top has a special magnet embedded into it along with a little plastic ridge which makes it easier to align your nail with the magnet.

On the side of the cap is a picture of the design this specific magnet will produce. I also tried holding the magnet next to the nail polish bottle and it is strong enough to produce the pattern through the glass! :O So there is a close up of the design included too!

As for color, the stuff in the bottle is a medium range of what you will get after the magnet magic. As you can see here, there are some little flecks of pink and silver mixed in which becomes super defined after the nail polish settles into the design.

Since purple is my favorite color Houses of Parliament was the obvious color pick for me. But the Silvery-chrome of Traflagar Square and luscious lagoon of Whitehall Teal where both pretty hard to pass up. However, at $16 a pop from Sephora I had to resist :<

I know LCN also has their own line of magnetic lacquers which includes: 8 Colors and 2 different pattern designs ( I want the starburst one so bad!!! ). These run about $10 per bottle and $20 per magnet on their site so I think overall its a comparable price.

Have any of you tried these fun polishes out yet? I'd love to know how the LCN ones look and even the other Nail Inc colors. ^_^

PS. Heres a little bonus of my pup trying to help out with the photoshoot :P

Tuesday, November 15, 2011

Mutt and Meow Manicure

I have kinda been in a manicure rut lately but, after doing the nail party post I was feeling pretty inspired by my friend's panda nail pictures. So I thought, why not give cute animals a shot too.

Also, since we had our holiday meeting at work coming up and I wanted to get into the spirit of things I thought what better way than to use our very own store mascots! A Haute Dog and Cool Cat duo.

Store mascots


Nails.

I think my doggie doesn't look too bad, but the kitty was really difficult for me to get exactly. >_<

I won't lie, since this was all hand painted by yours truly this manicure took me the better part of two pain staking hours of fume inhalation until I deemed it perfect. And really that judgment is mostly reserved for my left hand since I am not incredibly ambidextrous.

Left hand glory *g*

Right hand meh. >_>;;;

I did alternating colors on each hand; starting with the cute doggy on my left thumb and then the kitty on my right. Followed up with the classic paw prints in the corresponding colors and then finished with some polka dot fun on the pinky nails.

And here is my polish list. If I had planned this out better I would've looked for the corresponding colors but it was kinda a last minute decision so I ended up using what I had on hand.

Sinful colors – Mint Apple: Previously featured at this post here.

OPI for Sephora – A-Ha! Moment: My go to white nail polish for frenchies

OPI for Sephora – Never Enough Shoes: A gorgeous black with the tiniest hint of sparkle flecks to it.

Essie – Tart Deco: A lovely coral color. I can't tell you how long I spent looking for the perfect coral nail polish but when I found it, this was it!

Thanks for reading.

Thursday, November 10, 2011

Sail Away with Panda Nails

There are actually two manicures in this post :P Since I had a nail party with a couple of the girls a few weeks back and wanted to share the pictures with you all.

I did a Sailor theme for one of my gals per her request. (This was actually at the tail end of summer just as the Nautical trend was on its last legs).

Base color is Sally Hansen's Xtreme Wear – Blue it. I then stamped Konad and Bundle Monster plates with Insta-Dri – Whirlwind White and some China Glaze Gold in Passion.

Finally added some sparkle with Milani Jewel FX in Gold; which I nabbed from Target for like four bucks. These are big hexagon shaped glitters suspended in a clear base.

I've seen some swatches where people take the time to layer the gold glitter to canvas the whole nail and it is GORGEOUS!!! *g* I'm excited to try that look out too ~ Always Love me some glitters ^_^

My other girl did her own nails and they turned out adorable so I had to snap a few pictures to share.

Its Paws and Pandas!!! I love the one on her middle finger because he looks like he has a little mustache. XD

A close up of the “cute” one on her thumb.

She used Sally Hansen's Whirlwind White polish and a really old bottle of Wet n' Wild – Black Fog. Her main weapon of choice was a toothpick! I mean c'mon I need to use like five different dotting tools to be happy and she can whip this out with a toothpick? I'm telling ya this girl is amazing. She also does a really cute strawberry manicure I want to try sometime.

Well Til next time mateys! Argh ~ !

Thursday, October 27, 2011

Cocoa Metallic Konad Lattice

Hello again lovelies I'm now back from my adventuring in San Fran and here again with a new manicure for you all!!!

Since its starting to get rather chilly in the mornings now I wanted to do a color that had some warmth to it; so even if my fingertips feel freezing cold they can at least look nice and cozy! :P

I ended up choosing this rich medium brown by OPI – You don't know Jacques and stamping over it with China Glaze – Poetic and Konad plate m57.

I actually love You don't know Jacques lacquer by itself. It is such a rich, sultry brown that reminds me of an inviting cup of hot cocoa while simultaneously exuding this edgy sophistication when you wear it. This color totally speaks to me in a “I'm cool enough to wear nail polish but, too cool for all those gaudy colors” sort of way.

See!!! Isn't this gorgeous with out trying too hard?

But, alas, subtlety was never really my cup of tea and I have been dying to try this color combi out since I picked up China Glaze's Poetic...so I cracked >_<;;; I just couldn't leave well enough alone and after two days I whipped out my plates to start stamping. ^^;

And voila here is the final result. I used the lattice pattern on m57 to stamp half way down my tips and covered up the cut off with Konad's french plate m19.

For some reason I really felt compelled to take lots of pictures of this manicure so enjoy the extra eyecandy.

Overall I like the color combination; its a nice monochromatic pairing but I'll admit maybe the stamping was a little too much. ^^; Anywho! If you guys have any questions please leave a comment :D And hope ya'll likies!

Friday, October 21, 2011

Disco Konad Animal Print

So I'm road tripping up with the girls this weekend for some San Fran Anime Boys loving and these are the nails that are going with me! Decided I wanted to do a colorful look with a bold pattern for the festivities ahead.

I did my base coat in InstaDri – Whirlwind White and then stamped the leopard pattern from Konad plate M57 with Sally Hansen Xtream Wear Collection – Blue it, Deep Purple, and Posh Plum.

Here is my base coat...I don't really get the trend of white nails since it always reminds me of white out >_<. But thats okay cuz I will soon cover it up with pretty colors! Voila!

See, there! Much better :D Fit for some wild partying now ~

Or so I thought.... after a few days the chipping monster reared its ugly head and I ended up mixing it up a bit to try to hide the worst of it with Frenchies :D So hope you enjoy the eye candy. I'm off to a gluttonous weekend, one hopefully filled with pretty boys!

~Bunny

Friday, October 14, 2011

Flashback Friday - Water Marbling

So for today's Flashback I decided to do a little lump sum of my favorite water marbled manicures I've done so far. I originally got this idea from MySimpleLittlePleasures, a nailtastic blog, you should all check out. After seeing her tutorials I just had to give it a try.

My first attempt done with Gold, Purple, and Pink swirls. I used the gold as the base to give it some pop and topcoated with a glitter coat. Kinda reminds me of Katy Perry's E.T Music Video (but without the dumb rapping part).


Then my sister wanted to jump on the boat too so we tried out a neutral, monochromatic palette with Gold, White, and a Coco Brown. Loving the minimalism of this look without being too beige boring.

Finally we decided to do a more punk rock vamp look with just two colors this time. This one is probably my favorite out of the three and definitely want to try it on myself next time.

Cute Dinosaur not included :P

Water Marbling Tips:

- Use the lighter color as your base coat, it will really make it pop.

- Not all polishes spread equally. The only way to know if it will work is to try some drops of lacquer out.


- The more saturated the water is with nail polish the more the polish seems to spread easily. So I like to drop in some polish that I'm not too fond of anymore to warm up the water. (You'll notice that as you do your marbling the later nails are easier because of this)

- Definitely check out MySimpleLittlePleasure's water marbling tips. She has a great way of keeping your fingers clean as well as simple tutorials.


Hope ya'll enjoy and share if you try! :D


Monday, October 10, 2011

Blue Away Paws and Polka Dots


So its been a while since my last NOTD >_<; lately its been class, work, class, work and I just got a little overwhelmed but, I finally have a day off and here I am with some fun tips for ya'll.

I did blue with white paws and polka dots semi-inspired by bubzbeaty's panda nails tutorial that my bestie showed me a few weeks before. Those paws were just too cute to pass up!!!


I lacquered up my nails with two coats of China glaze – Aqua Baby, which is such a fun Mediterranean waters blue. And finished up with dots and paws in OPI for Sephora – A-Ha! Moment, a great white opaque enough for french manicures in one coat.

I wish I had taken more pictures of my nails but somehow this week went by and these were the only decent shot I got. So instead I'll finish off with a little tip the same bestie above taught me for clean manicures.

- When I want my frenchies to look more polished I don't trust my shaky hands to do the tips. Instead I paint on the polish and go back in with an acetone soaked q-tip till I get the neat curve I want.

-This usually works best before the nail polish dries too much. Two thin coats and about three minutes dry time usually does the trick.

-Finish up with a shiny top coat and any raised edges from erasing will melt away.

I used this trick to do the french on my thumb and the half moon on my ring finger and hope it helps you all too. :D

Friday, September 30, 2011

Flashback Fridays - Minnie Mouse Nails

Before starting this blog I would frequently just post my NOTD onto my facebook page but, now that I have a neat-o little place to show them all off I came up with Flashback Friday!


These will be manicures I've done in the past that I thought deserved a second chance to shine. So please excuse crappy image quality or lack of images in general. >_<;;;;

Debuting at Pursuit of Polish for the first time my Minnie Mouse Nails Manicure!

This is the manicure that started it all and so I deem it fitting as my first Flashback Friday post.

Before this I usually just slapped on two coats of color and was out the door. Maybe if I was feeling a little fancy I might take the time to do a french tip but, I had never delved into the wonderful world of nail art beyond that.

But then I saw this!

Tsu-chan's nails!!! I know the image is hard to see but I have more examples at the bottom :)

It was love at first sight! C'mon you can't deny that they are super darn cute!!! <3 The polka dots, the heart and the FRIGGEN BOW!!! (I LOVE BOWS *faint*)

And since I had some extra time on my hands (aka procrastinating) I thought I might as well give it a try. I had recently been gifted some nail art pens and thought, “Heck, it'll be a great chance to test 'em out!”


Little did I know that I would be opening a can of worms, soaked in nail polish fumes. x_x With my untrained, clumsy hands I managed to dot and heart my lefty (pictured above) to a somewhat satisfactory result.

But the right hand....Oh the horror! It was a slow torturous cycle of dot, hate, rinse, and repeat. I think I spent a good two hours alone on my right hand and I hadn't even addressed the best part yet, the bows!

Which unfortunately never did get done. T_T

By the time I bullied my sister into doing the heart for my right hand I was too cross eyed with acetone fumes to even walk straight. DX

So, as you can see, my little cop out above was to slap a black crystal on to get it over with. Of course, a day later, said black crystal fell off anyways and I ended up french tipping my ring fingers in black instead (which looked infinitely better than the crystal but, sadly I don't have any pictures of it :< ).

So even though my attempt is sad looking and miserable that doesn't mean you shall be robbed of great recreations of this manicure.

Here are some gals who totally nailed this look (Oh I'm so punny!!) XD.

Right down to those darn bows!

Tuesday, September 27, 2011

Silver and Black Konad Lace

Back again with a sassy silver NOTD look for you! This time I had a some fun with my Konad stamps (which I am LOVING to death!!!)

These nails make me feel like elegant, victorian glam and I am totally digging the sharp contrast between the silver and black.

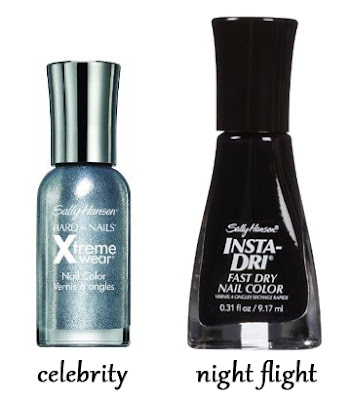
I did a Silver base coat in Sally Hansen Xtreme Wear – Celebrity and stamped Konad plates in Sally Hansen Insta Dri – Night Flight. Picked up both of these colors from Ulta for $2.59 and $4.95 respectively and am really happy with them.

This silver is a totally fun attention whore color. You really cannot wear this color without expecting people to notice your polish; its like covering your tips in aluminum foil! :P

And the best part is that it dries super fast! Which is a big plus in my book since when I Konad I find it least painful to use a quick dry polish as your base and an opaque color for your stamping lacquer.

You want the quick dry because the odds are (if you are anal like me) that the first time never turns out right. So you will be wiping your nail to get a clean slate to try, try again quite often. And really, who wants to waste time waiting for your polish to dry when the main course of this event is the stamping!?

The opaque color for stamping is a tip I picked up from prowling the interwebs. It seems that the most popular vote for compatible polishes, aside from the ones that Konad makes, are the following:

-Sally Hansen Insta Dri

- China Glaze metallics

- Polishes that pass the One Coat test (meaning the color is opaque enough and good to go in one coat)

I used Konad plate M69 for my thumb, M57 for my index, middle, and pinky, and stamped M60 on my ring finger.


Finished the whole look off with OPI clear top coat and I was ready to party!