Showing posts with label nail polish. Show all posts

Tuesday, May 15, 2012

Ez Pz Fluffy Clouds Nail Art

Happy Tuesday Everyone! 
I'm back again with some cuter than I expected new nail art for you! 
Fluffy Little Clouds! 


I was kinda dry out of inspiration and really loved this Wet n Wild Blue so I just slapped it on my finger tips, going for a normal solid color look. But once it was on, I started getting more in the mood of spring and went all out for something fresh and fun. 


The clouds were actually super easy, for how nice they turned out. My Favorite kind of nail art = Easy! I just took a bigger ball dotting tool and made clusters of dots until you get a nice fluffy blob! 


Zoom out and Voila! Clouds! I think the most important thing about this is the cloud spacing. I was going for a more cartoony look so i spaced them out evenly at a diagonal to one another. 


I showed my co-worker and she said next time I should do sheep. :P I love that idea! Just wondering how to execute it. Something a'la Shawn the Sheep would be awesome! 


Lacquer List: 
Wet n Wild - I need a Refresh-Mint 
Sephora by OPI - A-ha! Moment 


I know its just simple but I hope you all like it <3 

Thanks for reading! 
-wanyachu

Tuesday, May 8, 2012

Vertical Stripes Zoya Manicure

Hallo! Its Tuesday again, and for now looks like I'm back to once a week Manis.
Things have been a little busier than I expected, but I'm trying to get back to twice a week Posts again. So please be patient. 

On the brighter side I have a new look for you this week!
Inspired by my new Zoya Polish in Skylar Blue! 

 
Tada! 

How do you like it? The blue is such a great medium color that I wanted to pop it with some gold. I choose China Glaze - Passion as my accent color and love the Egyptian Look that resulted. 


I did actually tape off for the stripes on this look >_>;; I know, I'm just that anal. And in the end the stripes aren't the same width at all! But at least they have clean edges :3 


I really do love this new taping thing, I mean once discovered I'd say it changed my nail polish design life! So many more options, without taking as much time. Although, I suppose if I practiced enough with a steady hand I could be even faster with a striping brush. 


Sorry, I know this look is a little sloppy, I didn't have quiet enough time to let it dry before going to sleep, thus the small nicks and scratches in it. Also I realized that Skylar is kind of a textured coat, which resulted little bumps in my gold stripes :< Whoops! 


Well hope you all enjoyed! Thank you for reading! 

-wanyachu

Tuesday, May 1, 2012

Purple Sparkles Monotone Manicure

Hi all! It's that time of the week again - and I'm here with a new look for ya! 
I recently picked up two new polishes from RiteAid this weekend and here are my results.


They are actually pretty much the same hue, but one is a straight up shimmer while the other polish is infused with violet glitter. At first, I was torn as which to get, since essentially they were the same color, but for some reason I just couldn't resist having them both. ^^; Besides at about a dollar a pop it wasn't too hard to say yes.


Since, they were so close in color I decided I wanted to do a monotone look. Originally I was just going to do something simple like an accent nail. But when I tried that out, I just felt it was too booring! 


So I thought why not get a little more adventurous! And thus I ended up with this look. Dotting, Taping, Striping and Chevrons everywhere! :P


My Lacquer List:
Wet n Wild Megalast - Disturbia 217B (Pretty Shimmer)
Wet n Wild Wild Shine - Night Prowl (Violet Glitter)

As you can see its pretty much the same color, but with different accents. And really, unless you're in the sunlight you won't be able to see all these subtle designs on my nails ^^;


I think I took the most photos for this look so far, because it was so hard getting the light to hit at the right angle! ^^; But there you have it. A sleek monotone look, without too much flair unless you pay attention to  the details.


Also I'm really digging the new wet n wild packaging. I know I mentioned in the previous Pastel Polka Dots French Nail Post, that they had new bottles. But their wide tipped brush makes applying this stuff a snap! And I'm all for easy :P

Well hope you all enjoyed. :D And please stay tuned for more manicures <3
Thank you!

-wanyachu 

Tuesday, April 24, 2012

Pastel Polka Dot French Nails

Hi all! I know it's not Manicure Monday >_<;;; But my school just opened again, and my scheduling is a bit different this quarter. So I think I might have to change to Tuesday as my start of the week!

Anyways lets get down to the goodies!


This weekend I picked up some cute new polishes from Wet n Wild Megalast Collection: Candy-licious/Rose bonbon (209C) and I Need a Refresh-Mint (218A) and had some fun!

 They were just such sweet colors IMO I had to go back to doing something girly again :3 
I was kinda digging my Mod nail phase, but alas it has temporarily come to an end. If you can consider 2 manis a Phase either way >_>;;;  


But really, who can say no to some sugary colors and dots right? Throw in some glitter and Bam you're set! Feminine and frilly to the max. I just wish I had some deco bows to attach! Would be perfect Sweet Lolita Nails in a flash! 


I had actually seen a similar Mani in a Japanese Nail Mag at one point, and always thought I wanted to duplicate it. Of course theirs was much more fancy with sculpted lace and bows. *g* Maybe one day I can get deco nails. Like for my wedding! XD 


These French Nails are actually pretty simple to do. I just paint about half way down my finger tips and go back in with an acetone soaked Q Tip to create the clean curve. I then used some glitter clear coat and a toothpick to line the edges. 


Lacquer List
Wet n Wild - Candy-licious/Rose bonbon 
Wet n Wild - I need a Refresh-Mint
Nicole by OPI - Scandal Secrets & Sparkle  


I love their new bottle and brush designs! Makes this line of lacquer look way more classy than the $1.99 price tag :P They even did the fancy side embossing of the glass, like on Essie bottles! :P You can kinda see it between my finger tips.


I know this one wasn't too fancy, but I hope you all enjoyed! While those more edgey nails usually took me less time, I think I definitely enjoy the look of Fruff more <3 

Thanks for Reading! 
-wanyachu

Thursday, April 19, 2012

Saharan Color-Block Manicure

Hi all! Hope you didn't think I wouldn't make it! Cuz here I am with my Manicure for the week! ^_^ 


Even though I had a busy weekend, and an even busier week so far
 I'm glad I was able to come up with something to share with you all <3
So here is my take on the Trendy Colorblock! 

This was kind of a fluke actually. Originally I had plan to do some fancy dots, bows and bling over this three layer cake, but once I had it done I fell in love!!! 


The simplicity of it all was really appealing to me, which is unusual since my taste is known to be a little over the top. But this color combo, of the pale pearlescent pink, deep dark raspberry, and almost neon coral color was too perfect to mar with extra distractions.


I think these colors worked so well with this minimal mani. It just oozes sophistication with a hint of playfulness in the pop of coral. 


So simple to boot! I just painted on the light pink and let it dry. Then I went back over the top half with the corally color. Once that was completely dry, I used tape to section off the middle portion and laid in my darker band. 


Lacquer List: 
Chanel  Le Vernis - Le Perle 
China Glaze - Evening Seduction 
Essie - Tart Deco 


I know, most people can probably do this without tape guides. But I'm just so anal it would bother me to no end >_>;;; Also I think, the crisp lines add to that Mod Look. 


So I hope you all enjoyed this look. Lately I've been going more simplistic over fruffy. I wonder how long that trend will last. ^^; 


What about you all? Do you prefer simple and clean or deco galore 
when it comes to your finger tips? 
I'd love to know! 
-wanyachu


Thursday, April 12, 2012

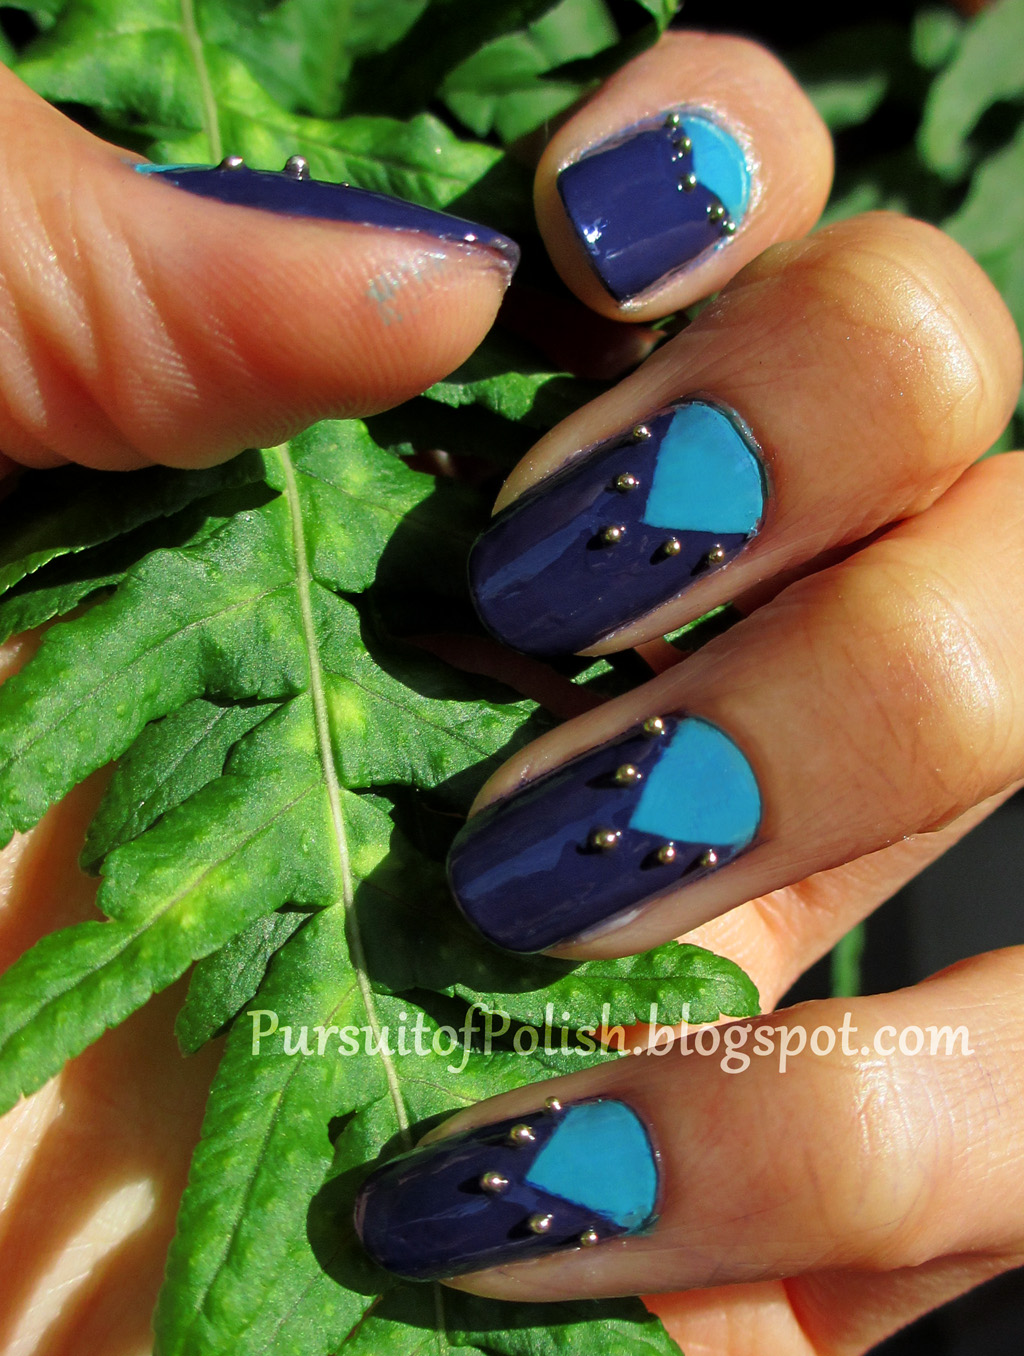
Studded Chevron Half Moon Mani

Hi all! Banged out my second look for you this week.


 What started as horrible art block ended up being quiet  stylish in my opinion. I always love when this happens! Makes the struggle all the more worth it! :D


I have been doing some pretty cutesy, fruffy feeling stuff lately so I wanted to do something more Modern. So here is my take on a more edgy, half moon mani. I pulled this off with some simple scotch tape and a tube of bullion beads I had laying around.


I spent so long trying to come up with an elaborate design, but sometimes simple really is best. Although, I couldn't control my ostentatious ways complete. I just had to throw in those gold beads as little stud accents! 


I used some new lacquers I picked up from Ulta for this look. The deep purple is Essies' - No More Film. And the teal cream is M.A.C's - Ocean Dip. 


No More Film is a gorgeous purple color, even though it's erring a bit darker in the photos. In real life its a great violet color, specially in the sun!

Ocean Dip is also a nice teal; a great fit for summer! The color is not as saturated as most teals I've been seeing lately, but the muted nature of this polish really makes the Purple in No More Film come out. 


I took a thicker top coat this time and then went in with a toothpick to apply the beads as studs. Once they were firmly place and pressed in, I went back with another topper just to be safe. 


On my Third day of wear I still have most of my studs! Which was pretty impressive, since I was sure I would've lost more by now. But once a few more fall off I think I might just cheat and dot some gold polish back in with a toothpick. Its like the poor man effect! 

Hope ya'll enjoyed! 

-wanyachu


Monday, April 9, 2012

Strawberry & Flowers Spring Mani

Happy Manicure Monday!
I hope you all had a fun filled Easter weekend. Even if you aren't celebrating for religious reasons, I'm sure there were lots of chocolate and candies to be had by all. :3 

In light of the lovely weather we have been having lately, 
I wanted to do a fun and fresh Spring look.


And what else says Spring more then some sweet, succulent Strawberreis!?    
Somehow...everything in my life is often associated with foods >_>;;;

So here is my take on the Strawberry Mani.


I know Strawberry Mani is not anything new or groundbreaking, so to jazz it up a bit I decided to throw in some of their cute, little white flowers into the mix. I did the flower with a dotting tool, and then added in some vines with a toothpick to finish off the look. 

I also made a quick little Photo Step - by - Step on how I did my Strawberries.


Lately, I'm really into using shipping labels as my nail art guides. I find them easier to cut into when you are various shapes (like the scalloped edge here) and I love that it isn't sticky until you peel off the back. 

I always have issues with the tape strips sticking everywhere but my nail. So the shipping label was a nice solution. Also I find these labels to be stickier than the normal hole punch protectors.

I cut this edge with some craft scissors, but I'm thinking you might be able to get some interesting shapes with a die cut punch! Can't wait to try! :P 


Here are my nails after Strawberry-ing them all up! I had originally done both hands as the fruit only, but decided that it wasn't exciting enough ^^; 


Lacquer List
Sephora by OPI - Personal Shopper as the red base
China Glaze - Entourage as leaves, vines, and flower centers 
Sephora by OPI - A-ha! Moment as flowers 

Pretty simple, but I think its nice and fresh for spring!. 


So I hope you guys enjoy this look! I think I might try a whole fruit series soon. Just trying to make a list of what other fruits would be Nail-able. If you have any suggestions lemme know in the comments too! 

-wanyachu

Monday, April 2, 2012

China Glaze Magnetix - Pull Me Close

Happy Manicure Monday to you all out there! 
Today I have a somewhat long awaited polish post, at least on my part, to share with you. 
It is China Glaze's Magnetix Polish in their silvery blue - Pull Me Close.


I remember being super excited when Nail Inc. announced their first Magnetic Polish last year! I managed to get a hold of their purple and have swatches here of  "Houses of Parliament". So when I found out China Glaze was also creating a similar polish set up, but with three types of magnetic patterns, I was ecstatic!


Also, I feel China Glaze was really smart about selling their magnet separately. Instead of including the magnet on the cap like Nail Inc. CG sells the three patterns on one magnetic plate by itself for $10. And then the polishes themselves cost an additional $10 a piece. Way my cost effective IMO. 


Aside from packaging though, I don't feel like any one formula was better than the other. Both Nail Inc. and China Glaze magnetic lacquers were very quick and easy to apply and lasted a good week once top coated.

Also, the red plate that these patterns are embedded in is really well designed, with the handy raised lip to help you align your nail just like Nail Inc.       


You get three different patterns, a Starburst, Chevron, and Diagonal Stripes on the plastic plate. And while I thought the Stripes produced a really crisp design I was somewhat disappointed with the other two. 

I noticed that when you first pull the magnet away from your nail the pattern it produces in the lacquer is very crisp. However, once you wait for it to dry a bit the lacquer spreads out and the design becomes blurry.  This is especially pronounced in the Starburst pattern. And while the images I have chosen below  are probably the best "before and after", many of my star nails ended up drying as blobs instead of stars. 

Before                                                    After

The Chevron pattern was also somewhat of a let down to me as it did not produce a clean angle as I expected. Instead you get a kind of wavy bump in the middle. I suppose this might be due to the the close proximity of the two converging lines that create the shape, but I am no magnet expert. :P 


So even though I was so excited about getting 3 patterns I only thought the stripes looked good enough to wear together. When I tried mixing and matching the others it just ended up looking too hodge podge. So I stuck with clean and simple. 


I suppose there might be some blurring with the stripes as well, but I think it is less noticeable because of the simplicity of the pattern. And in retrospect it was probably the same way with the Nail Inc. wavy pattern. I just didn't take time to notice in my Science Nails Excitement.


Have any of your got your hands on the Magnetic Nail Polishes? And if so what did you think of them? Either way I find them fun to play with and it really does create a unique and fun airbrush look you'd be hard press to get any other way. 

-wanychu