Monday, February 27, 2012

Mod Plum & Green Two Tone Manicure Tutorial

Hi lovelies, I'm back again for another Manicure Monday look!
This time I tried to do something a little different and put together a picture tutorial for you all. 
(If impatient click here for Picture Tutorial)


But first here is the completed look I'll be sporting this week on my nails. I wanted to do something colorful and fun for the lovely weather we have been having in the Golden state.  


The color palette for this look actually comes from some bowls we are selling at work :P I thought it was such a fresh combo of lime and plum that I couldn't resist trying it out on my tips. So see! Work is not a complete drain of creative energy, sometimes it can be an inspiration as well!

Luckily enough I went home and dug through my polish box and came up with these two beauties.


The Nail Polishes:

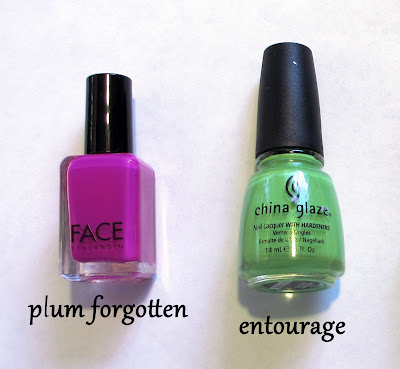
I received the FACE polish as a gift, but never got a chance to try it out. The color is a sensuous medium tone violet called, Plum Forgotten. I had never heard of their polishes before and was pleasantly surprised with how smooth and saturated this lacquer is. Interestingly enough it also dries slightly matte, but you can't tell here because I top coated over the final look.

The lime green on the left is China Glaze in Entourage. This is a very saturated yellow-green, bordering on chartreuse with fun micro glitter. I've actually had this polish for quite a while, but it is just so overpoweringly electric when worn by itself I never gave it much thought. So when I stumbled upon it again I realized what great potential it had as an accent color! And thus this look was born! :3


So without further ado here is my little step by step. 
Lemme know if you guys have any questions!


Tutorial

Step 0: Paint your nails and let completely dry! Sorry forgot to take a picture of that but ya'll know the drill. I did alternating colors of Plum Forgotten and Entourage.

Step 1: To make a clean curve between the two colors I hole punched circles out of envelope labels. I wanted to use those paper hole protector thingys...what are they called even!? The reinforcement stickers that kind of look like donuts....

Anyways, the point is that I didn't have any, probably because I don't even know what they are called =_= So I improvised!

You can really use anything that will stick to your nail and has a curve to it. I even had a friend once who cut masking tape to match the arc she wanted...but that's super dedication I don't have v_v;

Step 2: Stick your guide (tape, label, hole protector...) onto your nail! Be sure to center the curve or else you will get crooked a crooked arc. Make sure the edge where you will be paint over is securely pressed down so you don't get any leaks.

Then go to town and Paint 'em up!

Step 3: Quickly but carefully remove your guide. I suggest taking it off right after you lay down your lacquer. You don't want to leave your guide on for too long, or else any leaks that did manage to seep under will get a chance to dry.

***more taping off tips at my Pink Petite Four Tape Tutorial***

Step 4: Get out a dotting tool (toothpick, bobby pin, whatever floats your boat) and go dot away! Here I used OPI for Sephora – You don't know Jacques and A-Ha! Moment.

Ta dah! Now you're done and ready to rock this playful retro, manicure!
Sorry ended up being more wordy that I had anticipated. So to make it up for your candy starved eyes some more pretty pictures:P


Are you guys sick of seeing my garden foliage yet?
I will try to come up with more interesting props next time!


Thank you for reading! And please leave me any questions, comments, criticism, love...it will all be much appreciated!!!

-wanyachu  

Monday, February 20, 2012

Galaxy Pearls Half Moon Mani w/ Zoya!

Happy Manicure Monday again! Hope you all had a great weekend and for those of us lucky enough to still be in school, Huzzah that it is still continuing! :P Thank you presidents!

Since my past few posts have been very Pink oriented, thanks to Valentine's Day, I've decided to go in a totally opposite direction with a purplish gray for today's look. *ta dah*


I've actually been planing to do this look for a while, but never found the right color for it until now :P My sister picked up this lovely, cool toned Zoya gray recently from Ulta and I knew I just had to play with it. <3


This was my first time using a Zoya polish and I am in LOVE! It was soooo smooth going on and opaque enough for just one coat even though the lacquer itself is not thick and gooey. I'm wondering if all of their nail polishes are like this and can't wait to get my hands on more >:3


I topped it off with some Nail Inc. - Donmar collection and am totally digging this look. I mean just look at those flecks reflecting onto my palm *g* so much sparkly love going on I might go blind!!!


And here is my Nail Polish List:

Pretty simple compared to some of my other looks recently. I painted one coat of Zoya – Kelly, for the gray base about 2/3rds the way down my nail. Then I went in with a q-tip and some acetone to get the curved half moon look. I layered on Nail Inc.'s Donmar top coat for some fiery opal flecks and used my dotting tool to trim the bottom of the curve with white dots in OPI for Sephora, A-ha! Moment.


Overall, I think it's a really classy look. The dots remind me of a mini strand of pearls and the sparkles on the darker background are like a galaxy full of stars! *___* Fufufuuu so cheesy but now you know where I got the blog title from.


Had lots of good photos IMO this time so here are a few extra. Hope you all enjoy. And let me know if you have any questions or comments <3


-wanyachu 

Monday, February 13, 2012

Valentine's Day Manicure – Cracked & Konad

Hello all! This is the last of my little Valentine's Day Mani series. And the one I'll actually be sporting on that special day. (Which I'm actually doing nothing for ~_~;;; )


I wanted to do something fun and festive so I opted for a different look on each nail.


This look definitely screams Valentine's day to me and I wish I had done it for the Vday part we had at work. :P


I might have gone a little overboard. These nails have everything from nail stamps, polka dots, and even crackled polish! I really didn't hold back. Well I guess I left out the crystals :P


I used a rich red lacquer, OPI for Sephora – Personal Shopper, for my thumbs, pinky fingers and the free hand heart on my index. Then I painted Sally Hansen – Pink Blink on my ring and index fingers. I also used it to stamp Konad M59 and M56 and do the polka dots over the white, A-ha! Moment, on my middle finger. I finally finished off with China Glaze – Broken Hearted crackle, a gorgeous Hot Pink just fit for the occasion!


Well I hope you all have a great Valentine's Day! And I can't wait to see what looks you all have been sporting for the Day of Hearts!


-wanyachu

Tuesday, February 7, 2012

Pink Petit Four Mani w/ Tape Tutorial

Hi everyone! I'm sorry I missed my usually Monday post, but I have a really fun manicure to make up for it! :D

Inspired by some delicious treats and just in time for Valentine's Day I give you the Pink Petite Four scotch tape manicure! :D 


Okay so the right terminology might actually be Checker Cookies and not Petite Four...but Pink Checker Cookie Mani just doesn't sound as cute IMO. So I am sorry for misleading you! v_v;;; I mean there’s four squares...does that count for anything!?


Either way, don't they look delicious? ^_^ I'm super pleased with how this turned out, even if it was way more work than I had originally anticipated.


So I started off with two coats of Sally Hansen Insta-Dri: Pink Blink and let dry completely! This is super important, otherwise when you go to put down the scotch tape it will smudge your base coat. I think I waited around 3 - 5 minutes just to be safe.


I then tore off small sections of tape and cut those in half. This left me with good sized strips to block off the first square on my nails. I then went through taping & painting this first square onto each of my fingertips. Remember to press firmly along the tape edges so you get a crisp line.


For the chocolate color I used OPI for Sephora – Studs & Stilettos, pictured above, in relatively thin, fast coats. You don't want to use too much polish while blocking off, or else things will get messy when you try to pull up the tape.

I also found it helpful to peel the tape off right after you lay down the polish instead of waiting for it to dry completely. This not only gave a cleaner line but also some time to swipe up any polish that leaked under the tape with a q-tip dabbed in acetone.


Once the first round of quartering was finished on both hands I went back in to add the second square. By now the first finger I had painted was dry enough for me to restart the process again. Just be careful to line up your tape with the edges of the first chocolate square you painted.


I ended up adding some faux pearls and crystals in the center and Voila you're done! ^_^

Hope you enjoyed this sweet manicure and if you have any questions feel free to leave a comment below :D

Thanks!

-wanyachu